Cisco IR829 Tinkering
Introduction:
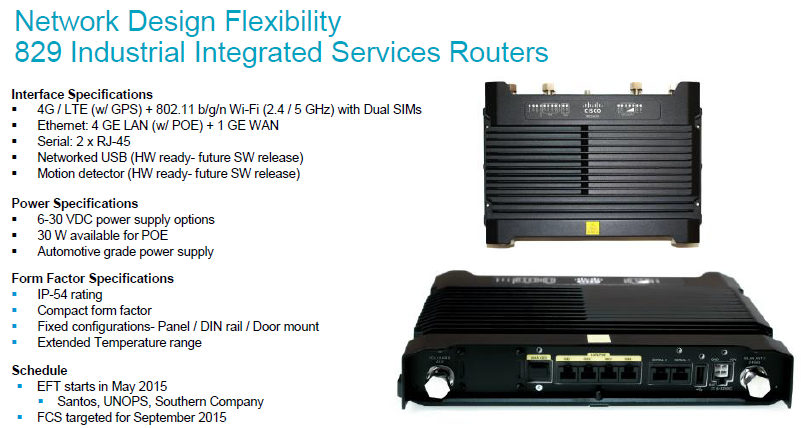
The IR829 router is a rather interesting beast, it has 4G, wireless, GPS, an accelerometer, water resistant, fanless, gigabit switchports + WAN and vehicle ignition system features. It's also got the ability to run VM / containerised services within a small linux environment on the router itself. This post will serve as a dumping ground for stuff I've found out when having a play!
Diving In:
First and foremost, the Cisco data sheet should be your primary source of reference: http://www.cisco.com/c/en/us/td/docs/routers/access/800/829/hardware/install/guide/829hwinst/pview.html
Console Access:
There's no standard RJ45 console port, the device comes with a USB cable which plugs into the router. You'll need to undo the small panel at the top end of the router held in place with two screws. This will give access to the console port, the two SIM card slots and the reset button.
The console software can be obtained from the following:
Mac:
According to the package above, mac shouldn't need anything. But I did so found some working drivers here:
https://www.silabs.com/products/development-tools/software/usb-to-uart-bridge-vcp-drivers#mac
Since I use a mac you can use the following to find your console port:
dchidell@dchidell-mac:~$ ls /dev/tty*
/dev/tty
/dev/tty.Bluetooth-Incoming-Port
/dev/tty.DavidsiPhone-WirelessiAP
/dev/tty.SLAB_USBtoUART	          <-------
/dev/tty.SLAB_USBtoUART3             <-------
You can then use screen (or whatever terminal program you prefer). I had to use the /dev/tty.SLAB_USBtoUART3 line.
Power:
I use a standard 800 series 4 pin power supply with +12V on one rail and GND on another. The other two ports are unused. However the official power documentation can be found here:
Image Upgrade:
This device runs a slightly different version of code called IOx which has a hypervisor and linux appliance built in, so when you download code you can install a bundle which will update the lot. The latest code can be found here:
I'm not going to go through how to get the image on the router etc, that's the usual trivial stuff. The command to upgrade is as follows:
bundle install flash:ir800-universalk9-bundle.SPA.156-3.M2.bin
DCHIDELL-DESK#bundle install flash:ir800-universalk9-bundle.SPA.156-3.M2.bin
 Installing bundle image: /ir800-universalk9-bundle.SPA.156-3.M2.bin.............................................................................................

updating Hypervisor image...
 Sending file modes: C0444 25121649 ir800-hv.srp.SPA.2.6.23

    SRP md5 verification passed!


updating IOS image...
 Sending file modes: C0664 63956256 ir800-universalk9-mz.SPA.156-3.M2

    IOS md5 verification passed!
Done!

DCHIDELL-DESK#
The router will take some time to power up the next time it's reloaded as it will perform the upgrade on all the components.
WAN Port Optics:
The WAN port is a single SFP 1G port. It's supposed to be used with rugged SFPs however you can use standard SFPs if you enable unsupported transceivers:
This is a hidden command so you'll have to type out the whole thing.
DCHIDELL-DESK(config)#service unsupported-transceiver
 Warning: When Cisco determines that a fault or defect can be traced to
the use of third-party transceivers installed by a customer or reseller,
then, at Cisco's discretion, Cisco may withhold support under warranty or
a Cisco support program. In the course of providing support for a Cisco
networking product Cisco may require that the end user install Cisco
transceivers if Cisco determines that removing third-party parts will
assist Cisco in diagnosing the cause of a support issue.

DCHIDELL-DESK(config)#
GPS:
Now I've not actually got GPS properly working as I don't have an antenna, however from what I can see this is how you can use the dedicated GPS port:
DCHIDELL-DESK(config)#controller cellular 0
DCHIDELL-DESK(config-controller)#lte gps ?
  enable  enable GPS feature
  mode    select GPS mode
  nmea    enable NMEA data

DCHIDELL-DESK(config-controller)#lte gps enable
DCHIDELL-DESK(config-controller)#lte gps mode ?
  ms-based    select MS-based A-GPS mode using secure Google SUPL service
  standalone  select Standalone mode

DCHIDELL-DESK(config-controller)#lte gps mode standalone
[Cellular0]: Please ensure NMEA is enabled in order to get all satellite and GPS location information!
[Cellular0]: GPS mode selected successfully
DCHIDELL-DESK(config-controller)#lte gps nmea ?
  ip      NMEA over IP interface
  serial  NMEA over serial interface

DCHIDELL-DESK(config-controller)#lte gps nmea ip
[Cellular0]: NMEA streaming engine switched ON
DCHIDELL-DESK(config-controller)#
DCHIDELL-DESK(config-controller)#exit
DCHIDELL-DESK(config)#exit
DCHIDELL-DESK#show cellular 0 gps

GPS Info
-------------
GPS Feature: enabled
GPS Port Selected: Dedicated GPS port
GPS Status: GPS acquiring
GPS auto tracking status: unknown
GPS auto tracking config: disabled
GPS Mode Configured: standalone
Last Location Fix Error: Not Available [0x0]
Latitude: 0 Deg 0 Min 0 Sec North
Longitude: 0 Deg 0 Min 0 Sec North
Timestamp (GMT): Sun Jan  6 00:00:00 1980

Fix type index: 0, Height: 0 m
Satellite Info
----------------
DCHIDELL-DESK#
More info here: http://www.cisco.com/c/en/us/td/docs/routers/access/800/829/software/configuration/guide/IR800config/modems-antennas.html#21916
Guest OS Pool (Linux VM):
This router has the ability to host a small linux appliance. This is internally connected to the router on internal interfce Gig5.
Requirements:
- IPv6 enabled (This is how the internal linux OS communicated with the router's IOx)
- DHCP Pool (Containers / VMs will use this to get addressing)
- Routing protocol or NAT to get the subnet out of the router
!
ip dhcp pool gospool
 network 10.25.0.0 255.255.255.0
 default-router 10.25.0.1
 dns-server 8.8.8.8 8.8.4.4
 lease 5
!
!
interface GigabitEthernet5
 ip address 10.25.0.1 255.255.255.0
 ip nat inside
 ip virtual-reassembly in
 duplex auto
 speed auto
 ipv6 address autoconfig
 ipv6 enable
end
You can then start the guest OS using guest-os 1 start
Once Gig5 is configured you can get to the linux guest os by starting it up and telnetting to any IP on the router port 2070. But first console access has to be enabled:
DCHIDELL-DESK#guest-os 1 start
 Starting Guest OS ...... Done!

DCHIDELL-DESK#
DCHIDELL-DESK#conf t
DCHIDELL-DESK(config)#line 1/4
DCHIDELL-DESK(config-line)#transport input all
DCHIDELL-DESK(config-line)#exit
DCHIDELL-DESK(config)#exit
DCHIDELL-DESK#telnet 10.25.0.1 2070
Trying 10.25.0.1, 2070 ... Open


User Access Verification

Username: dchidell
Password: <ios password>
By default the user is root with no password. However I've already configured aaa authentication on the router for SSH and so you have to use your local username and password to login.
To disconnect from the console push CTRL+SHIFT+X then push the number 6 on the keyboard. You'll be returned to the router prompt. You must then type disconenct or if you hit enter a couple of times it will put you back into the session!
IOx Application GUI:
Once you have the IOx instance running and happy, you can connect to the linux server behind the router using it's web GUI. First check for the address in a show ip dhcp bind or use ifconfig from within the telnet session described earlier.
You can either go to this address directly in which case you'll need port 8443 however I am using NAT so have create the following rule to get from the GUI externally on the standard port 443:
ip nat inside source static tcp 10.25.0.2 8443 interface Vlan517 443
More information on the guest-os can be found here: http://www.cisco.com/c/en/us/td/docs/routers/access/800/829/software/configuration/guide/IR800config/guest-os.pdf
WLAN (Internal Access Point):
The IR829 has a built-in access point you can use. Similarly to other 800 series routers and ISRs you must configure the access point separately to the router. This has the advantage of the AP being able to run in autonomous mode (by itself) or lightweight (with a controller).
First you must assign an IP to the wlan-ap0 interface, a /32 address will do as this is only used internally:
interface wlan-ap0
 ip address 1.1.1.1 255.255.255.255
end
Then you can connect to the console using the service-module wlan-ap 0 session command. You'll have to do use the whole CTRL+SHIFT+6 then hit X to detach from the terminal then disconnect to close the session.
The internal ap runs the autonomous mode by default and uses the credentials cisco/cisco for the username and password. I actually had problems logging in initially and had to reset the ap to factory defaults. This can be done by running the following: service-module wlan-ap 0 reset default-config